Intro
The git repo used for this blog.
OTG or better known as Open Traffic Generator is a means of creating modeling for multiple traffic generators with a controller which acts as a northbound API which can be exposed a grpc or restful endpoint.
![]()
The idea behind the project is largely related to creating models for traffic generators. The way I can explain this or what works for me best is the way openconfig is a giant abstraction of generic models for network configuration and state is the way I would compare this for traffic generators.
The models can be found here which are written in OpenAPIv3 Spec. They are NOT written in YANG which I think everyone can agree upon is a good thing.
Like networking devices models there are various models in which OTG can control.
- Ixia-C
- Keng(Keysight Elastic Network Generator) We will be deploying with this.
- IxNetwork
- Magna
- TRex
This as far as I can see can work for virtual environments as well as physical environments. This can even work really well within ONDATRA a long side gosnappi for testing. In most cases I have seen with KNE and ONDATRA is you can generate traffic from multiple different types of traffic bgp, ospf etc and or craft packets or doing things that traffic generators are normally used for.
OTG generally makes it a lot easier since it is a API that works across multiple different traffic generators. This has a lot of great features but in a really dynamic environment like KNE has to offer this allows for a person to spin up and down environments easily and insert traffic generators within the topology then create flows programmatically.
Interworkings of OTG
This gets a bit difficult in my opinion at first to wrap your brain around if you have never used this. I have to give a huge shoutout to Alex Bortok who answered a lot of my questions early on. We will be using this with KNE using ths KNE file from the git repo.
The KNE integration is quite neat because you can leverage this in a dynamic test environment running within Kubernetes. We will get to this part in the next segment.
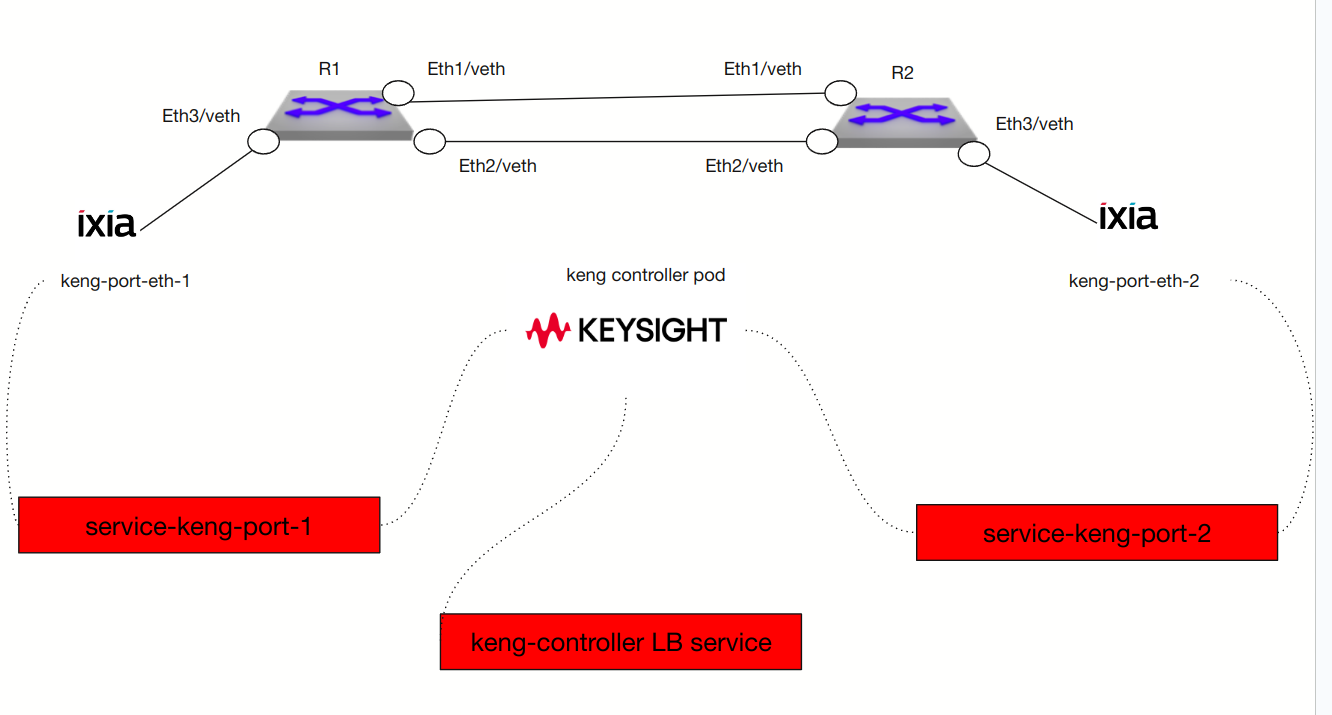
Here is what our environment looks like.
Deployment on K8s / KNE
Running pods within the ceos namespsace for reference.
kubectl get pods -n ceos
NAME              READY   STATUS    RESTARTS   AGE
keng-controller   2/2     Running   0          31m
keng-port-eth1    2/2     Running   0          31m
keng-port-eth2    2/2     Running   0          31m
keng-port-eth4    2/2     Running   0          31m
keng-port-eth5    2/2     Running   0          31m
r1                1/1     Running   0          31m
r2                1/1     Running   0          31m
In the previous picture there are 2 pods which are Ixia traffic generator they are the source/dest for the traffic generation. So connected to R1 on Eth3 is a ixia pod and connected to R2 on Eth3 is a ixia pod.
They receive their instructions via the keng controller. It will tell them to create flows back and forth from Ixia 1 to Ixia 2 for example. The way you do this is talking to the API / Controller.
Through either rest of the gRPC service you send the controller information like what types of flows and endpoints which we will get into a bit later.
From the KNE file from the git repo.. We can see the links portion which KNE is used to cable everything up.
links: {
    a_node: "r1"
    a_int: "eth3"
    z_node: "keng"
    z_int: "eth1"
}
links: {
    a_node: "r2"
    a_int: "eth3"
    z_node: "keng"
    z_int: "eth2"
}
So KNE will connect and wire everything up appropriately. You might be asking yourself how does KNE know which pods to connect to r2/r3? This is where the tricky part comes in. You need to install both a licensing file in the form of a configmap which tells the KENG operator which versions of the pod to install.
Here is a snippet of the configmap for example.
    {
        "release": "v0.1",
        "images": [
            {
                "name": "controller",
                "path": "ghcr.io/open-traffic-generator/keng-controller",
                "tag": "0.1.0-3"
            },
            {
                "name": "gnmi-server",
                "path": "ghcr.io/open-traffic-generator/otg-gnmi-server",
                "tag": "1.13.0"
            },
            {
                "name": "traffic-engine",
                "path": "ghcr.io/open-traffic-generator/ixia-c-traffic-engine",
                "tag": "1.6.0.85"
            },
            {
                "name": "protocol-engine",
                "path": "ghcr.io/open-traffic-generator/ixia-c-protocol-engine",
                "tag": "1.00.0.337"
            }
        ]
    }
Lets try to break this down as much as I can.
*** release *** This is the release version of KENG.
*** images *** This is going to be which containers will be deployed in specific areas.
*** traffic-engine *** The
*** traffic-engine *** the ixia-c-traffic-engine:1.6.0.85 will be deployed for every time the link is connected to keng.  So r1/r2 will both use this container.
Within the repo both the manifests for the licensing and the controller need to be installed. Otherwise, it will not work. All of the versioning within KNE needs to match for example within KNE the KENG controller needs to look like the following.
nodes: {
    name: "keng"
    vendor: KEYSIGHT
    version: "v0.1"
    services: {
        key: 8443
        value: {
            name: "https"
            inside: 8443
        }
    }
    services: {
        key: 40051
        value: {
            name: "grpc"
            inside: 40051
        }
    }
    services: {
        key: 50051
        value: {
            name: "gnmi"
            inside: 50051
        }
    }
}
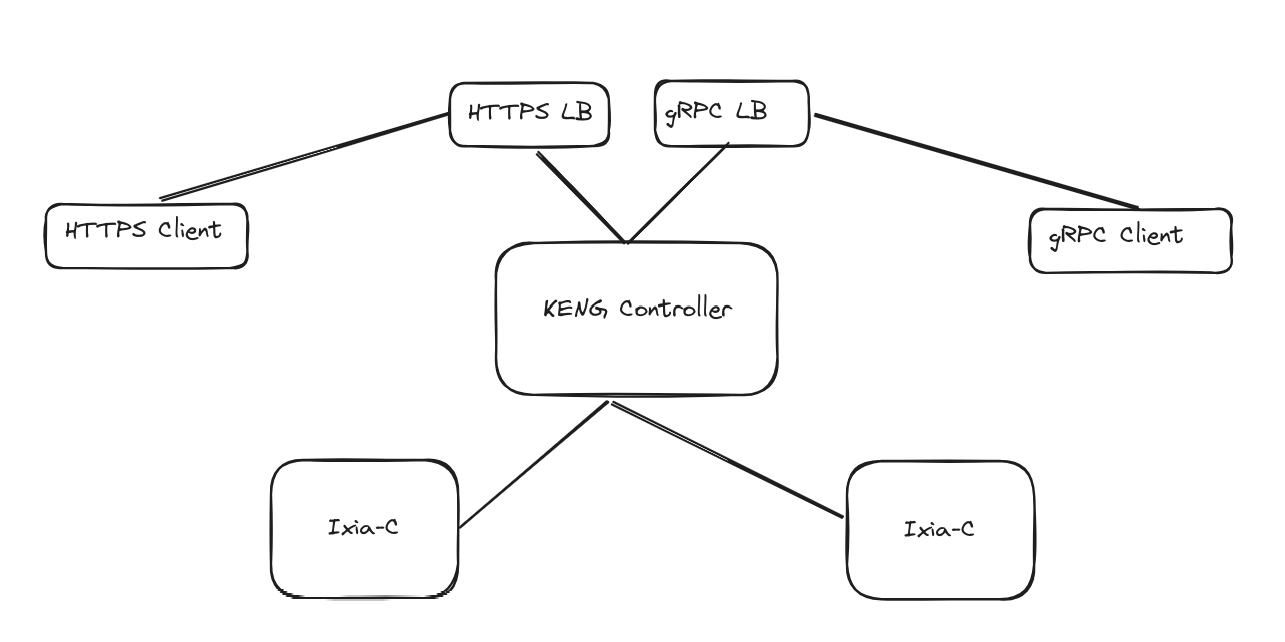
This archetecture once again should look like this
Once deployed within Kubernetes it looks like the following.
service-gnmi-keng-controller    LoadBalancer   10.96.123.94    172.18.100.0   50051:31731/TCP                             8h
service-grpc-keng-controller    LoadBalancer   10.96.137.209   172.18.100.1   40051:30408/TCP                             8h
service-https-keng-controller   LoadBalancer   10.96.187.54    172.18.100.2   8443:30239/TCP                              8h
With the two pods which also have services so keng controller can talk with them.
service-keng-port-eth1          LoadBalancer   10.96.74.27     172.18.100.6   5555:31353/TCP,50071:32228/TCP              8h
service-keng-port-eth2          LoadBalancer   10.96.170.144   172.18.100.3   5555:31033/TCP,50071:30080/TCP              8h
So once again flow for flow here. The client talks to the API which is also the controller. The data which is sent is sent as a model(payload) in either rest or grpc. This modeled data is not just applicable to keng but anything else which participated within OTG. The KENG controller in this situation will then take that flow data and run tests.
Clients
There are multiple clients to talk to any of the OTG controllers/API.
The most common and by far the easiest is the otgen binary. it is pretty simplistic in my opinion. I have examples of this here
You can also send rest with really anything to the controller with curl or something like python requests or go net/http rather easily like this example.
The most powerful in my opinion is snappi. So snappi from my little amount of research is simply a language binding either python or gosnappi which allows you to talk to OTG through either go or python. My gosnappi example is here. It is pretty much a manual job just to get this to work for demo / learning purposes.
The tests
So lets run both the otgen and gosnappi tests and I will explain the results within this section.
Once again this is all within the git repo for this blog.
cd otgen
➜  otgen source otgtest.sh
INFO[0000] Applying OTG config...
INFO[0000] ready.
INFO[0000] Starting protocols...
INFO[0000] waiting for protocols to come up...
INFO[0000] Starting traffic...
INFO[0000] started...
INFO[0000] Total packets to transmit: 1000, ETA is: 5s
+-------+-----------+-----------+
| NAME  | FRAMES TX | FRAMES RX |
+-------+-----------+-----------+
| f-1-2 |      1000 |      1000 |
+-------+-----------+-----------+

INFO[0005] Stopping traffic...
INFO[0005] stopped.
INFO[0005] Stopping protocols...
INFO[0005] stopped.
Doing this out of code with gosnappi
cd gosnappi
go run main.go
..truncated output
2024/03/01 11:10:42 choice: port_metrics
port_metrics:
- bytes_rx: "243"
  bytes_rx_rate: 0
  bytes_tx: "243"
  bytes_tx_rate: 0
  capture: stopped
  frames_rx: "2"
  frames_rx_rate: 0
  frames_tx: "0"
  frames_tx_rate: 0
  link: up
  location: service-keng-port-eth1.ceos.svc.cluster.local:5555;1
  name: p1
  transmit: stopped
 <nil>
Port  p1
Received  243
Transmitted  243
An explanation of the otgen binary which is a bit easier than going line by line through the code.
controllerip=$(kubectl get services -n ceos service-https-keng-controller -o jsonpath='{.status.loadBalancer.ingress[0].ip}')
export OTG_API="https://${controllerip}:8443"
otgen create device -n otg1 -p p1 -l eth1 --ip 10.10.10.2 --prefix 30 --gw 10.10.10.1 | \
otgen add device    -n otg2 -p p2 -l eth2 --ip 20.20.20.2 --prefix 30 --gw 20.20.20.1 | \
otgen add flow -n f-1-2 --tx otg1 --rx otg2 --src 10.10.10.2 --dst 20.20.20.2 --count 1000 --rate 200 --size 256 --timestamps --latency ct --proto udp | \
otgen --log info run -k -m flow | otgen transform -m flow | otgen display -m table
The first few lines get the IP Address of the keng controller. The next few lines create the location of the device and give it an IP address and default gateway. So for example, R1 is connected to otg1/p1 on Eth3 which has an ip address of 10.10.10.1/30 which is its default gw. You then create the flow. The otgen binary translates all of this to the correct modeleted data. This takes traffic from otg1 and otg2 receives it. The last portion kicks off the flow and displays the pretty graph.
Here is a look at the controller config.
controllerip=$(kubectl get services -n ceos service-https-keng-controller -o jsonpath='{.status.loadBalancer.ingress[0].ip}')
export OTG_API="https://${controllerip}:8443"
curl -k $OTG_API/config | jq .
If you go to the controller with the /config path you will get the config for the flows. There is a ton of data so I will go through the relevant parts.
  "ports": [
    {
      "location": "eth1",
      "name": "p1"
    },
    {
      "location": "eth2",
      "name": "p2"
    }
  ]
These are the ports that are connected.
"devices": [
    {
      "ethernets": [
        {
          "connection": {
            "choice": "port_name",
            "port_name": "p1"
          },
          "ipv4_addresses": [
            {
              "gateway": "10.10.10.1",
              "address": "10.10.10.2",
              "prefix": 30,
              "name": "otg1.eth[0].ipv4[0]"
            }
          ],
          "mac": "02:00:00:00:01:aa",
          "mtu": 1500,
          "name": "otg1.eth[0]"
        }
      ],
      "name": "otg1"
    },
    {
      "ethernets": [
        {
          "connection": {
            "choice": "port_name",
            "port_name": "p2"
          },
          "ipv4_addresses": [
            {
              "gateway": "20.20.20.1",
              "address": "20.20.20.2",
              "prefix": 30,
              "name": "otg2.eth[0].ipv4[0]"
            }
          ],
          "mac": "02:00:00:00:02:aa",
          "mtu": 1500,
          "name": "otg2.eth[0]"
        }
      ],
      "name": "otg2"
    }
These are the devices.
Finally, the flows.
"flows": [
    {
      "tx_rx": {
        "choice": "device",
        "device": {
          "mode": "mesh",
          "tx_names": [
            "otg1.eth[0].ipv4[0]"
          ],
          "rx_names": [
            "otg2.eth[0].ipv4[0]"
          ]
        }
      },
It is super important to note that what is within the controllers /config path is the actual OTG model for the flows.
The part which really tripped me up the entire time was how did keng know the IP addresses of the devices and or their kubernetes service addresses?
This is going to be extremely confusing unless someone reading this knows and understands Kubernetes very well. Keng and I am sure other controllers probably do the same but the controller can ask Kubernetes for the service addresses of the devices and where they are. The specific CRD object it looks for is called “IxiaTG” in my case.
 kubectl get  IxiaTG -A -o json  | jq .items
"interfaces": [
        {
          "interface": "eth1",
          "name": "eth1",
          "pod_name": "keng-port-eth1"
        },
        {
          "interface": "eth2",
          "name": "eth2",
          "pod_name": "keng-port-eth2"
        }
      ]
And then within otgen or code I have to call each one of these eth1/eth2 same goes with the KNE topology file.
That way it can use the service-keng-port-ethx
kubectl get services -n ceos
service-keng-port-eth1          LoadBalancer   10.96.82.170    172.18.100.5   5555:30972/TCP,50071:31138/TCP              20m
service-keng-port-eth2          LoadBalancer   10.96.81.247    172.18.100.6   5555:31884/TCP,50071:31894/TCP              20m
Sort of confusing but very interesting the way this works. I generally like it.